How to Kit Brew
Ok so now you have your stuff, you know how to clean your stuff and now we are ready to MAKE the stuff..
When making kit brews the first choice you need to make is:
Regular cheaper beer kit which requires adding some form of sugars to? (8-9 pounds to buy + cost of the sugars)
More expensive 1kg beer kit which is ALL MALT and requires no additional sugars? (18 pounds+)
In terms of making them up they are very similar in time taken and identicle almost in method.
Generally the 1kg kits taste better but some kit companies like “Coopers” do some exceptional beers which require additional sugars. Obviously using high quality sugars will make them better (such as beer enhancer or spray malt)
Recommended kits: (Please note i dont get anything out of any of these suppliers for recomending them, im just trying to save your cash)
Woodfordes kits are easy to make and have a generally reliable yeast packet inside. The end result (assuming the yeast works) is excellent. They are generally 18-20 pounds.
Coopers kits are australian kits which require 1kg of additional sugars. They are EXCELLENT kits (If your making a lager type use Glucose, if your making a bitter type then beer enhancer or spray malt…but glucose or even sugar works ok) Average price is 9-10 quid + cost of sugars
Geordie Kits. These kits have a bad reputation but erm…they are fine? Ive made a bunch before (Usually to try something silly like adding ginger too or something) Cheap price for decent beer. Average price is 7 quid + cost of sugars.

Fermenter (with airlock if you have one which can take one)
Long spoon (cheap plastic ladel is fine)
Hydrometer with trial jar
Thermometer
Funnel (Very handy if you have the fermenter with a screw lid which is much narrower than the other fermenter)
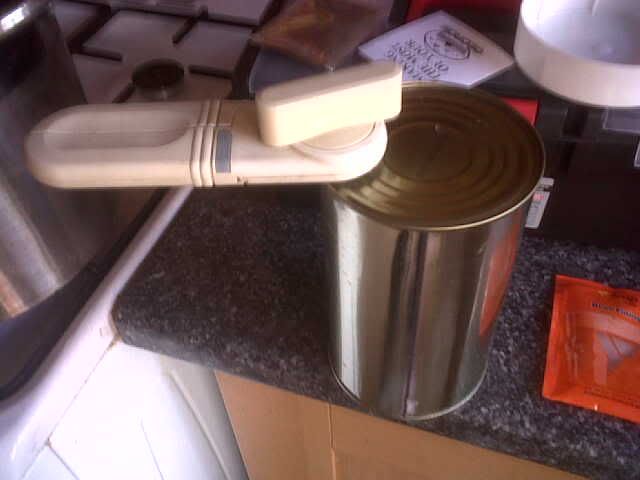
Can opener (nothing worse than getting ready to go and realising you cant open the can)
Kettle (to erm…boil water)
Jug (for getting the yeast going. Pyrex ones are ace)
MAKE SURE EVERYTHING IS CLEANED, STERILISED AND RINSED (If you do this I swear nothing will go wrong)
STEP 1: Preperation
Doing a few simple things now will save time later. When making kits if you follow a few simple rules like cleaning as you go and getting water hot ahead of time it shaves a lot of time off.
a) Preboil a full kettle of water
Since the insides of a can from a beer kit are so insanly THICK AND VISCOUS it pays off in a big way to open the can a fraction with a sterilised can opener, just so there is a small hole for pressure to escape. Once this has been done place in a ban of boiling water and heat very gently. After 5 mins or so the insides will be more easily pourable. You will need to refill and reboil the kettle after this.

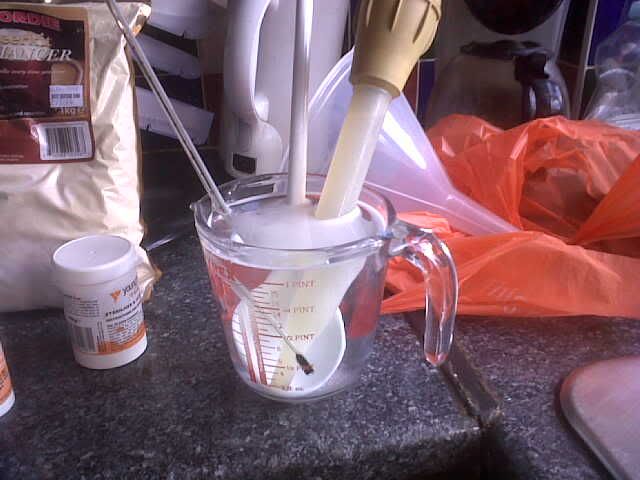
Pour some of the boiling water into the jug, about half full for a small jug is fine. This water will be left to cool for the yeast to be prepared in (Ideal is 18-23 degrees C)
b) Make sure you have some place CLEAN (on kitchen roll would be fine) to put items when not in use so they are not left on a potentially dirty surface
STEP 2: Getting the yeast going
Once the water in the jug is down to the right tempreture of 18-23 degrees C (Add a little cold water if it’s too hot) carefully open the yeast sachet and pour into the water with a teaspoon of sugar. Cover this with some kitchen roll and put in a warm place. This will get the yeast going and give it a much higher chance of survival.
STEP 3: Open the can
The contents of the can is basically a very thick malt concentrate. If we didnt heat the can it would not pour well. With some oven gloves or a towel lift the can out the pan and place on the surface.
Open the remainder of the can taking care not to touch the malt inside with your hands.
Pour the entire contents into the fermenter.
Next pour some boiling water into the can and stir with a spoon, the aim is that NO malt be left in the can AT ALL. Every last bit of the syrup you get out will make your beer better. The can will be HOT after this so take care when lifting.
Once nothing remains in the can dispose of this in your recycling bin.
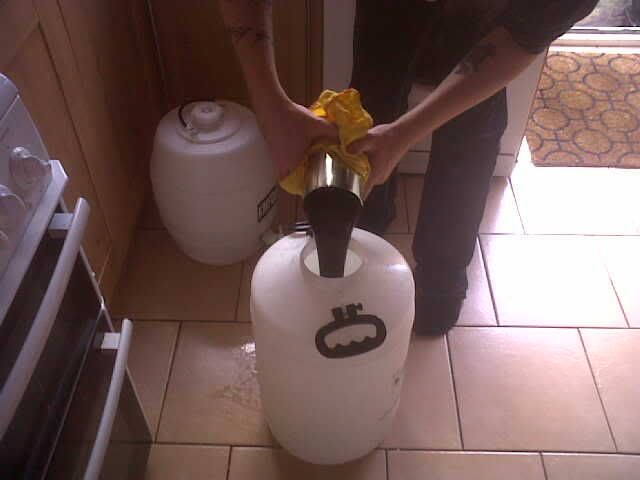
STEP 4: Adding boiling water
The instructions in your beer kit will tell you how much exactly but i just always add another whole kettle of boiling water. Once you have poured this in STIR VIGOUROUSLY or (if you own a fermenter with handles SWIRL the liquid until ALL the malt is dissolved inside)
The more you agitate the mixture the more oxygen is mixed in which helps the yeast divide. MORE MIXING AND OXYGEN = BETTER BEER. Thrashing the beer with a spoon works well if you can avoid it splashing over the edge. Make sure your hands are clean when you do this in case any splashes on you and falls back in.
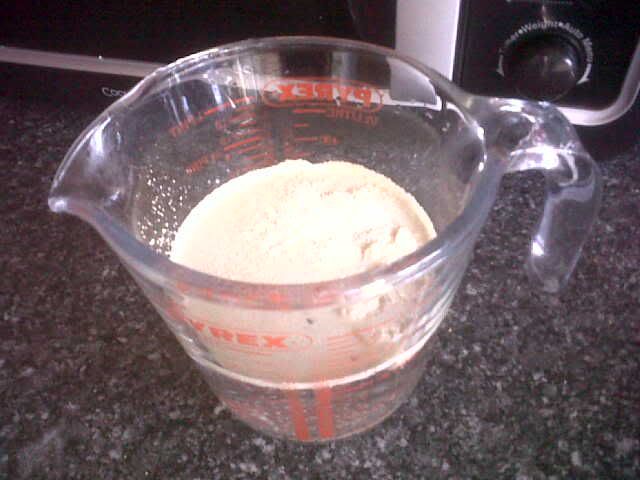
STEP 5: Adding the sugars
Now mixing whatever sugars in you have at this point is fine. But it’s best to add them premixed in liquid. Bring a pan of water to the boil to sterilise the water and add your sugars to the pan and stir till all is dissolved.

Take care when adding spray malt or beer enhancer as the steam will make the powder clump around the hole in the bag. Stir till no lumps/powder remains and add to the fermenter stirring well. STIRRING VIGOUROUSLY now will give a great start to the beer.
STEP 6: Topping up with cold water
Now we need to top up to 25 litres (I personally aim for 23 litres as this gives the beer a bit more body) with cold water. This will bring the tempreture down to about 18-23 degrees. If its too high then either leave with the lid resting on for a while till it comes down (Dont be tempted to add too much cold water in case you go over 25 litres)
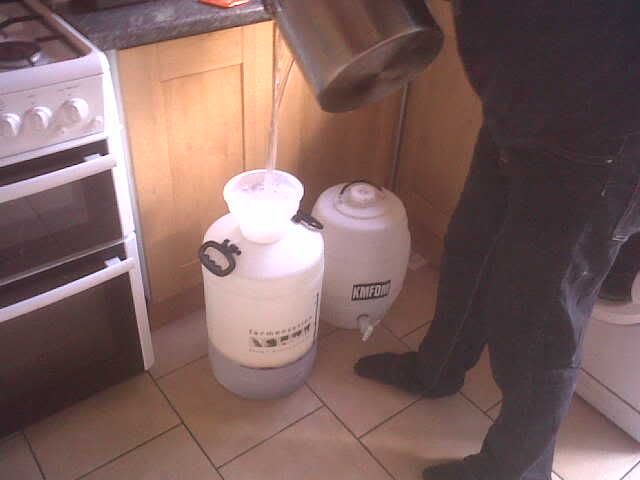
Try to pour the water in front a good height to force lots of oxygen into the mix, the more the water is thrashed about and displaced the better. I find a large stock pot is good for this and you can pour from a great height without splashing.
Once we are at in the 18-23 degree C range continue..
STEP 7: Pitching the yeast
Pitching is just another term for adding. The yeast by now should look like below and be clearly active. Dont worry if it’s not its still probably ok (But it doesnt hurt to keep spare packs on hand and adding more than 1 pack of yeast has no drawbacks)
Stir gently with your spoon
STEP 8: Fit the lid
If you are using a fermenter without an airlock (Such as the fermenter with the lid) its a good idea to open the lid a crack to allow gas to escape and lay a clean towel over the top. Not only does this keep it warmer but also stops any overflowing yeast escaping onto the floor better. It also keeps dirt and such from getting in.
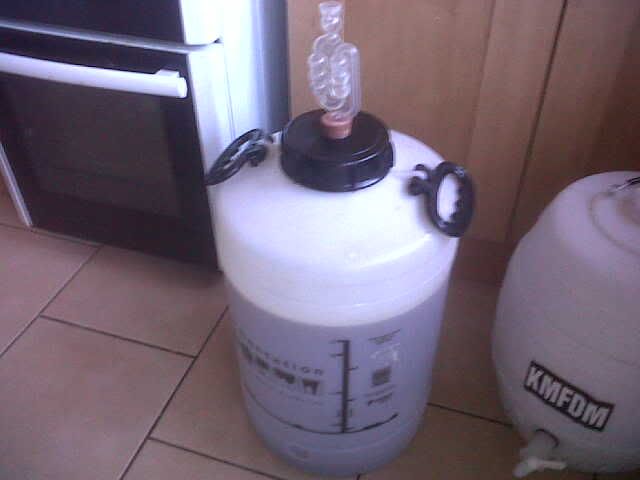
If you are using one with an airlock make sure the lid is on tight and the airlock has some sterilised water in, not too much. Just enough to level out in the u-bend.
STEP 9: Find a warm place to ferment which DOESNT FLUCTUATE often
Although it is important for the beer to be between 18 and 23 degrees hotter than this E.g. upto 26-27 is generally ok.
Any colder and the yeast may become dormant and not fully ferment the sugars. Hotter and the yeast may simply die.
Another important thing to note is tempreture flucations can cause the yeast to extract esters from the ingredients and cause nasty “off” flavours. So a room which doesnt change too often OR covering with a blanket may help keep the tempreture stable.
STEP 10: Measuring the gravity of the brew
After 3 days take your sterilised turkey baster and get some of the brew and 3/4 fill the trial jar. Drop the hydrometer in and look at the reading. Its essential to get “on a level” with the hydrometer to get an accurate reading.
Generally beer is done at about 1.005-1.010 on a hydrometer. But the real rule of thumb which its important to follow especially if your bottling is:
If you take 2 readings the same 2-3 days apart then you know the beer has finished fermenting.
At this point I would recommend leaving 1 more day to clear a bit and reduce the amount of sediment floating about (2 days will not hurt either as long as you havent been opening it often as the Carbon Dioxide layer keeps beer fresh)
STEP 11: Kegging/Bottling
This will have its own section soon but when transferring beer to whatever container/s you have chosen you need to PRIME the beer.
Since must of the sugars have been used up by the yeast there is little left to generate carbon dixoide in the bottle/barrel and keep it fresh. For this reason we add a certain quantity of sugar (cane sugar is best) so this can be consumed by the yeast in the container and create pressure (Eventually it will begin to carbonate the beer so its fizzy if in bottles)
120 grams of cane sugar disolved into some preboiled and then cooled water will suffice.
This can be added to the final mixture and gently stirred. This can then be bottled/kegged.